IRT Analyzer uses so-called analysis objects to present thermal information contained in an infrared image.
Objects belong to five groups:
·Points (spots)
·Lines
·Areas
·Measures
·Annotations
Measures and annotations do not use temperature information. Measures display geometrical dimensions of objects on the image. Annotations are used to put text and visually mark areas on the image.
Points, lines, and areas are thermographic objects. They participate in image temperature calculation. Same as the whole image, every thermographic analysis object can have its own emissivity, ambient temperature, averaging factor, software filters and other parameters.
Creating objects
To create an object, you should use a corresponding object tool from the image toolbar.

Selection tools
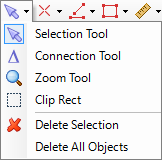
·Selection tool: selects, moves, resizes, and activates objects.
·Connection tool: connects two or more objects to compare them.
·Clip rectangle tool: marks some part of an image to copy it to the Clipboard.
·Delete Selection: deletes selected objects from the image.
·Delete All Objects: deletes all object from the image.
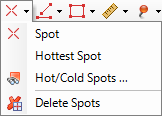
·Spot tool: creates a new spot object.
·Hottest Spot: finds the hottest point on the image and creates spot object there - hot spot object.
·Hot/Cold Spots: opens a dialog to search for more hottest or coldest spots on the image.
·Delete Spots: deletes all spots from the image.
To create spot objects, select the spot tool and click on the image. |
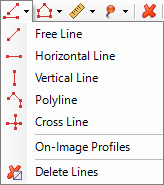
·Free Line | Horizontal Line | Vertical Line | Polyline | Cross Line: creates line of the corresponding type on the image.
·On-Image Profiles: turns on or off profile display on all lines on the image.
·Delete Lines: deletes all line objects.
To create a line object, select the corresponding line tool. Press the left mouse button on the image spot where line must begin and, holding the button, move the mouse to the spot where line must end, release the mouse button. To create a polyline, create the first segment as described above, then click on image successively to create next segments. To stop polyline creation, press the right mouse button or select any other tool in the toolbar. |
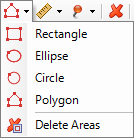
·Rectangle | Ellipse | Circle | Polygon: create the corresponding area object.
·Delete Areas: deletes all area objects.
To create an area object, select the corresponding area tool. Press the left mouse button on an image spot and, holding the button, move the mouse to another image spot, release the mouse button. To create a polygon, create the first polygon segment as described above, then click on image successively to create next segments. To stop polygon creation, press the right mouse button or select any other tool in the toolbar. |

·Ruler | Horizontal Ruler | Vertical Ruler: create a ruler object. Ruler object defines image real world dimensions.
·Measure Line: creates a measure object to measure distance between two image points.
·Measure Angle: creates an angle object to measure angles on the image.
·Delete Rulers: deletes all rulers.
·Delete Measures: deletes all measures.
Drawing tools
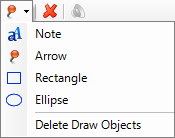
·Note: creates a text object on the image
·Arrow: draws arrow on the image.
·Rectangle | Ellipse: draws rectangle or ellipse.
·Delete Draw Objects: deletes all draw objects.
Active and selected objects
Object can be in the following states:
·active (only one)
·selected (several is possible)
·not selected

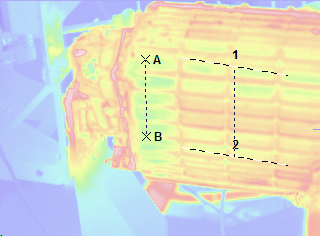
The picture above shows objects in all three states:
·Area 1 is active (black squares around)
·Points A and B are selected (white squares)
·Line 1 and Point C is neither active nor selected
Active object is important - many operations, that need an object, use the active object. This is why name of the active object is show in the caption of the image window. When there is no active object, whole image is active. To activate the image, click outside objects with the selection tool.
You will use multiple object selection, for example, to move several objects together, keeping relative positions unchanged. Selecting objects in IRT Analyzer is like selecting icons on the desktop. To select several objects, use the selection tool and, holding the Shift key, click on objects you want to select. Active object is always the last clicked one.
To switch quickly to the selection tool after an object is created, click with the right mouse button at any place on the image. To select all objects, use Ctrl+A key combination. |
Object groups
You can group several objects together. Grouped objects are similar to selected objects, but selection is permanent: when you select one object, other objects in the group are selected automatically.
To group several objects, select them, click with the right mouse button on one of them and choose 'Group' in the menu. To ungroup objects, call the context menu and choose 'Ungroup'.
Grouping two area objects does not union their areas. They are still two separate objects. |
Connected objects
To connect two objects, use the connection tool: click on one object with the left mouse button and, holding it, move the mouse pointer to the second object, then release the button. If you made it correctly, you will see a dash line connecting the objects.
Only objects of same type connect to each other: points to points, lines to lines, areas to areas.
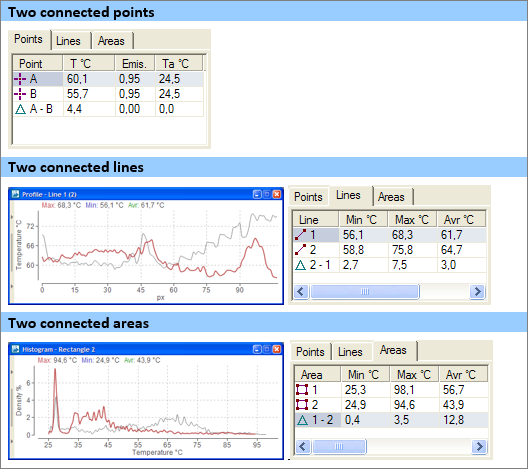
The effect of connecting two objects depends on the objects type. For points you will see temperature difference if the 'Analysis Objects' statistics window. For lines and areas, beside the difference calculation, you will see two and more profiles or histograms in one window.
Another way of creating connected objects is to use the selection tool: holding the Control key, move the desired object to another place. In this case the two objects will be connected, and the second object will be an exact copy of the first one.
Hidden objects
Sometimes you do not need to have all the objects visible at the same time. Especially this is the case for the ruler objects.
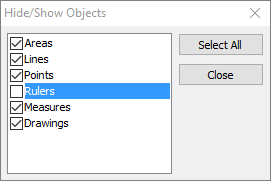
To hide an object, click on it with the right button and in the context menu choose 'Hide'. The object will disappear, but it is not deleted.
To show an object back choose 'Hide/Show Objects' in the main menu or the same item in the context menu of the image. A dialog will appear, where you can select which type of object to make visible or invisible.