


Fluke TV40 series cameras have GigEVision interface and can be connected to a PC using Ethernet cable. When connected to a local area network the camera acts as any other Ethernet (IPv4) device and needs an IP address:
·If a DHCP server is available, camera gets IP address from the DHCP server.
·If there are no DHCP server or camera is connected directly to the Ethernet port of a PC - IP address is selected automatically from the private IP range: 169.254.0.1 through 169.254.255.254.
·It is also possible to set a fixed IP address in an Internet browser using the camera web interface (you need to know current IP address of the camera and type it in the address line).
Configuring network adapter for direct camera to PC connection
You can connect Ethernet cable from the camera directly to the PC, without any router in between. In this case camera IP address is selected from the automatic private IP range.
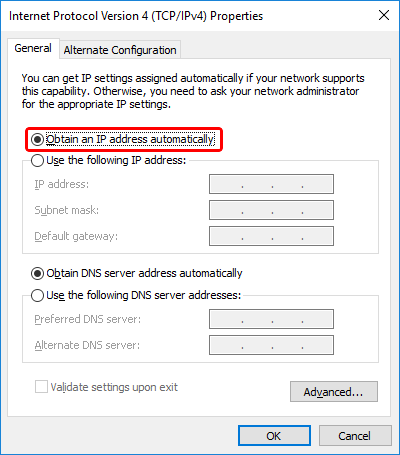
To communicate with the camera, your PC network adapter must be configured to use the same IP range (subnet). The easiest way to do it is to select "Obtain an IP address automatically" option in the TCP/IPv4 settings of the PC network adapter connected to the camera. In this case computer's IP address will be also automatically selected in the same 169.254.X.X range.
Connecting to the camera
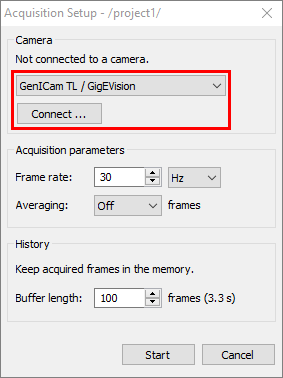
1.In IRT Analyzer open Acquisition Setup dialog by selecting main menu item 'Camera | Connect'. Chose 'GenICam TL / GigEVision' camera type and press 'Connect' button.
2.Select the camera you want to connect to, and press 'Connect' button. If you do not see the camera in the list, you can try to update camera list by pressing 'Refresh' button.
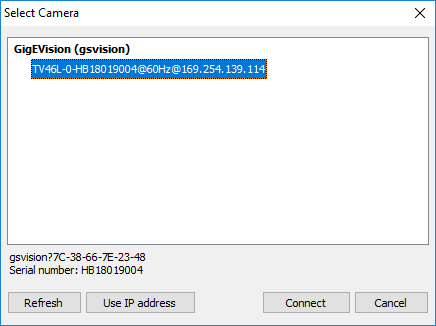
Text "other subnet" after the camera name means that IP address of the camera does not match IP address of the PC: the PC and the camera are in different subnets. If the subnets are not linked by a router connection to the camera will not be possible. Text "in use" after the camera name means that another PC or another program on your PC already established connection with the camera. This will not allow you to connect. |
Connecting to camera in another subnet
If the camera and the PC are in different subnets, IRT Analyzer cannot detect camera automatically. Reason for this - camera discovery messages are broadcasted and, in most cases, broadcasted messages are not forwarded by routers to other subnets. To overcome this limitation, you must know the IP address of the camera and set it by clicking 'Use IP address' button.
Changing camera settings: focusing, temperature range, shutter
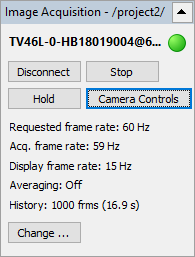
After you connected to the camera you can change camera settings, like focusing, temperature range and non-uniformity correction parameters. Chose 'Camera | Camera Controls' in the main menu or click corresponding button in the 'Image Acquisition' window.
When you press 'Camera Controls' you will see this dialog:
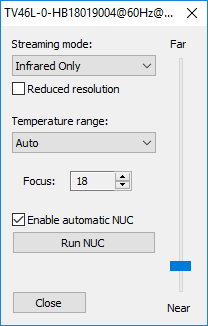
Streaming mode
Can be 'Infrared Only' or 'Fusion'. TV40 cameras also have visible module, in case of 'Fusion' images from this visible module are sent to IRT Analyzer, displayed in Preview window, and can be used with the Fusion function.
Reduced resolution
This option allows to reduce infrared image resolution by half. Can be useful when you experience problems with losses during data transmission or low PC side performance.
Temperature range
Your camera is calibrated to measure temperatures in different ranges. If the viewed object has a high temperature and a low temperature range is selected in the camera, measured temperature values will be inaccurate or completely wrong.
'Auto' range: camera will automatically select the appropriate range. Using Auto range is not recommended in Automation mode as range switch may happen during an important measurement. Range switch procedure takes several seconds. During this period measured values may be wrong.
Focus
Allows to drive motorized focus position. Displayed focus position number has no physical meaning. Use 'Near-Far' slider to change focus position. Focus edit box spin buttons are handy for fine focus changes.
Enable automatic NUC
When enabled, camera will run non-uniformity correction procedure at moments of time it selects automatically by measuring the sensor temperature.
Run NUC
Press this button to tell camera to execute non-uniformity correction.