Virtual kiln 3D
 This view displays the virtual kiln model in three dimensions. To switch to the Virtual Kiln 3D view, press the corresponding button in the toolbar.
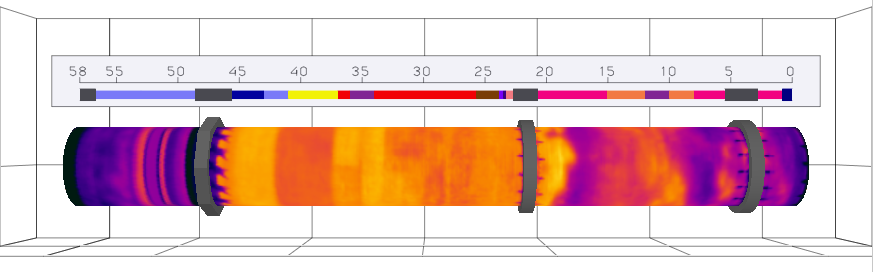
The 3D virtual kiln model consist of the following parts:
·The kiln shell with infrared image on it;
·live rings and the gear rim;
·kiln trigger position marker (red triangle);
·ruler with refractory zones.
The kiln model on the screen rotates at the same speed as the real kiln. You can stop the rotation on the screen by clicking  button in the local toolbar or choosing Show Kiln Rotation command in the 3D menu.
Virtual kiln 3D view can be combined with other views on the screen:
· combines 3D view with the Temperature map view;
· combines 3D view with the Reference view;
· 3D view is displayed full-screen.
These options are available in the local toolbar and in the View / Windows menu.
Adjusting the 3D scene view
The following actions can be used to arrange the scene:
1.Mouse move when the left button is pressed (by default) rotates the scene. The kiln will turn in the indicated direction so that you could see it from other angles.
2.Mouse wheel (scrolling) changes the zoom moving the kiln model nearer or farther.
3.Mouse move when the middle button (wheel) is pressed moves scene right/left, up/down over the screen.
4.Double-click with the left mouse button resets the scene – returns the scene to the default position after you have rotated, moved or zoomed the model.
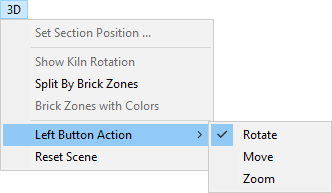
However the left button action can be changed: to rotate, to move or to zoom the scene. This is useful when your mouse does not have the wheel. To change the left button action, use the 3D main menu or the context menu.
Split by brick zones
 Virtual Kiln 3D view has an additional display mode: Split by Brick Zones. In this case the kiln (static or in motion) is cut into pieces according to the brick refractory zones (shadow zones are hidden). To return to the whole view, push the same button again.
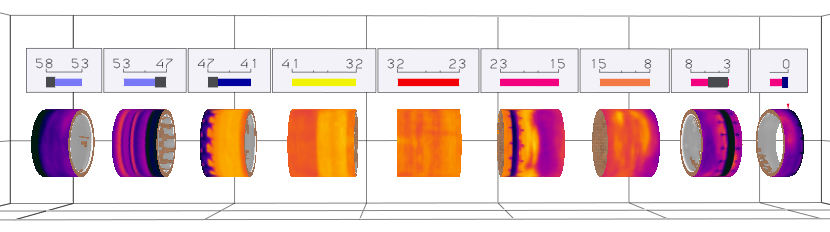
Split by Brick Zones view makes differences between the brick zones more obvious.
Kiln section 3D view
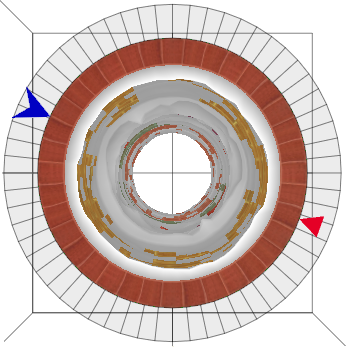
 Kiln Section 3D View virtually cuts the kiln at some position. So it shows more the kiln interior (bricks and coating), while the Virtual Kiln 3D view is more suitable for observing kiln's surface.
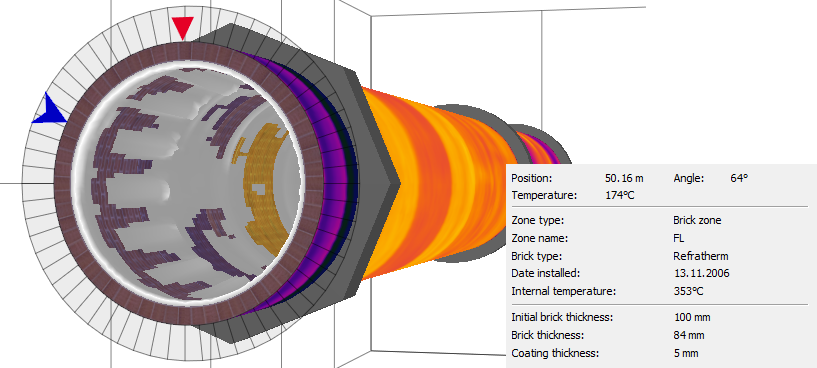
The small red triangle shows the kiln trigger position (as set in the Configuration). Blue arrow is the angle position marker. Dragging it you can see brick and coating parameters at any point along the kiln circumference.
Changing section position
To change section position, click on the kiln with the left mouse button and holding it drag the mouse left or right. Mouse wheel can be also used for this purpose.
You can change the section position by dragging the cursor at the kiln design view or at the 2D infrared image view (if it is displayed).
 You can also set the exact section position and value of the angle marker manually. Click Set Section Position in the context menu (or press the appropriate button in the local toolbar) and key in needed position and angle value.

Colored bricks
Section 3D has one more display mode: Colored Bricks. In this mode color of bricks is defined by mixing the original texture color with the color of corresponding brick zone taken from the refractory structure.
 Click the corresponding button in the local toolbar (or choose menu 3D / Brick Zones with Colors) to see refractory zones in different colors.
Scene arrangement
1.The local toolbar contains a slider that rotates scene from 60° to 120°.
2.Section position can be changed by mouse wheel or mouse moving while left button pressed.
3.Angle position marker (blue arrow) can be dragged when the mouse pointer is over it (the mouse pointer changes its shape).
4.Double-click on the section position marker to open the Section Position dialog.
5.Double-click on any area outside the blue arrow to reset the scene to the normal position and orientation.
Kiln end-view 3D
 Kiln end-view is a special case of the Kiln Section 3D view when scene angle is fixed at 90°. The rest of the functionality is the same.