


To see live IR image, you need to connect to the camera and start image acquisition.
Camera drivers If your camera uses USB or IEEE1394/Firewire interfaces to connect to PC you need to make sure that appropriate camera drivers are installed. IRT Analyzer does not include camera drivers, please consult camera documentation for the driver installation procedure. |
To connect to a camera, select 'Camera | Connect' in the main menu or press the corresponding button  in the toolbar.
After connecting to the camera and setting acquisition parameters press 'Start' to start image acquisition.
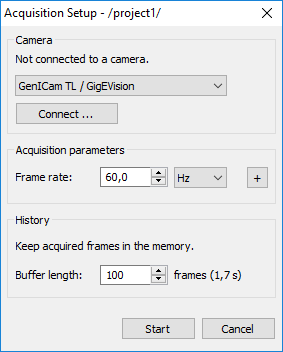
Connecting to the camera
In the 'Camera' group select camera type that you are connecting to. Press 'Connect' button.
You will see connection parameters for your type of camera:
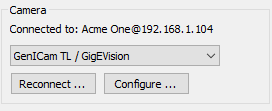
When connection to the camera is established, you will see the corresponding message:
Acquisition parameters
Frame rate
IRT Analyzer does not know the real frame rate of the connected camera; it allows to set any frame rate. If you want to run acquisition at the maximum frame rate then select a value which is obviously bigger than the maximum camera frame rate, for example 100 Hz.
To reduce frame rate - select a value lower than the camera frame rate. IRT Analyzer will try to send a command to the camera to deliver frames at a lower frame rate. If such command is not available frame rate will be reduced by skipping excess frames.
Frame rate is normally specified in Hz which has the same meaning as frames per second (FPS). When you need low frame rates, lower than one frame in a second, it is more convenient to use time delay between frames as measure of the acquisition speed. For example, you can set frame rate to be '2 min': one frame will be acquired every 2 minutes.
IRT Analyzer keeps acquired images in the memory buffer. Here you can set the size of this buffer. It is a cycle buffer - when it gets full the oldest frame is removed to free space for the new frame.
Maximum buffer size is limited only by available PC memory. You can set any buffer length, but when IRT Analyzer sees that there is no more memory available it starts to delete old frames even when buffer length has not reached the specified limit.
Uses of the history buffer:
·You can pause image acquisition and go back in time to see what was happening before.
·Images in the memory buffer are used to build temperature trends.
·After acquisition is stopped you can save images from the memory buffer to disk (for high-speed IR cameras this is the only way not to lose frames because of HDD is not fast enough).
·Frames from the memory buffer are used for pre-trigger recording to save events that were happening just before start trigger was fired.
Advanced acquisition parameters
To show advanced acquisition parameters click on the button with plus sign.
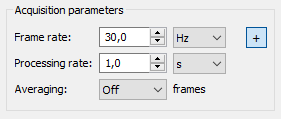
Processing rate
With the help of processing rate parameter, it is possible to set a lower update rate for analysis functions:
1.History buffer. Allows to not to put all acquired images to the buffer and therefore to cover longer period with the same limited buffer size.
2.Trends.
3.Automation mode measurements and alarms.
Averaging
When averaging is enabled, several consequent frames are combined together. Every pixel of the resulting frame has a value which is an average of pixel values of the several source frames.
Averaging is used to improve temperature reading accuracy, but it can only be used on slowly changing scenes.
Applying averaging will not reduce resulting frame rate - IRT Analyzer updates averaged image with every new frame.
Acquisition status window
State of the running acquisition is shown in the Tools Panel:
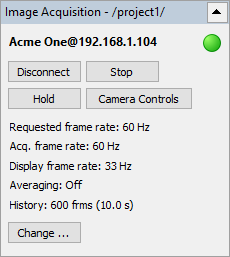
This window contains several important real-time parameters:
·Green light signals that connection is present - data is being received from the camera.
·Requested frame rate: rate that program tries to achieve (excess frames are skipped).
·Acquisition frame rate: real measured rate at which frames are acquired and added to the memory buffer. Having this value lower than the frame rate at which camera works (and of the requested frame rate) means that there are either problems with data transfer or with PC performance.
·Display frame rate: real measured rate at which frames are displayed on screen. This parameter is sacrificed when program tries to meet goals for the acquisition frame rate.
And command buttons:
·Disconnect: stops acquisition and disconnects from the camera. Use it to change acquisition parameters, to reconnect the camera or to connect to another camera.
·Stop/Start: stops image acquisition if it is running or starts it when acquisition is stopped. Connection to the camera is kept, but the camera is instructed not to send image data.
·Hold/Resume: stops or resumes live display of the acquired images. When on hold, images continue to be added to the memory buffer (no data loss), but the current image is frozen. Also, in the hold mode you can use Sequence Player to display an earlier frame from the memory buffer.
·Camera Controls: shows dialog with camera controls, like focusing, temperature range selection and others.
·Change: allows to change acquisition parameters (frame rate, averaging, buffer size) without disconnecting from the camera.